

JHP Newsletter - 2013, No. 5, 30 October
Greetings from near Chehalis, Washington. Jan and I have been in the Pacific Northwest, mostly Oregon, for about the last month and a half. I haven't been here since 2005, and it's good to be back.
Equipment: Lee Filters Lens Adapter Ring Canon 17mm TS-E
Lee Filters has recently released an adapter ring to attach their regular Foundation Kit, which holds 4-inch or 100mm filters, to a Canon TS-E 17mm f4 L tilt/shift lens. They warn that the adapter will reduce the available motions by about half without vignetting, and I was excited to try one out so that I would have access to my full set of 4-inch filters and not only the limited set of 6-inch filters that I use with my DIY SW150 adapter.
The first thing I did after receiving the adapter was test the range of motions that could be used without vignetting, and I was disappointed, but not too surprised, by my results. When the camera (Canon EOS 1D X with a full-frame sensor) is mounted in landscape orientation, the lens can be shifted 5mm up or down without vignetting. That's less than half the possible 12mm of shift, but about the maximum I usually use because the corners get really soft at 10mm of shift. The full 6.5° of tilt up or down can be used with zero shift. When the camera is mounted in portrait orientation, only 2mm of shift up and down or 1.5° of tilt up and down can be used without vignetting which is a severe limitation when making a 2x3 aspect-ratio image.
Then I added a Singh-Ray Cokin Z-Pro Sprocket Mount LB Warming Polarizer in the first slot of the Foundation Kit. There is no vignetting other than what was caused by just the Lee Adapter, but the filter has to be adjusted up and down in the holder if shift is used. Putting the polarizer in the second slot causes vignetting no matter what shift is used.
We'll see how the adapter works in practice. I'll be able to use my full complement of 4-inch, or 100mm, filters, but either the available motions will be severely limited or I'll be restricted to making 4x5 aspect-ratio images. As a result, I'm not ready to give up my DIY SW150 filter holder and limited set of 6-inch, or 150mm, filters.
Equipment: Eizo ColorEdge CG246 Monitor And Hardware-Based Calibration
My eight-year old Eizo ColorEdge CG210 external computer monitor started having problems and I had to get a replacement. The biggest requirement for me is to have hardware-based calibration, and as far as I know, only Eizo in their ColorEdge line and NEC in their MultiSync and SpectraView lines offer it.
Why is hardware-based calibration so important? It lets your monitor display the greatest range of colors as accurately as possible. Most calibration, especially in the Apple Macintosh environment, is strictly software based. Your computer displays a series of known RGB values that a measurement device evaluates, and then a color profile is created so that when your computer wants to display a specific color, the correct RGB values are sent to the monitor. No significant changes can made to the monitor itself because Apple only lets you adjust the brightness on their displays. This all sounds great, and a monitor calibrated using only this technique will display better color than an uncalibrated monitor. However, the range of accurate colors will likely be reduced with such a software-only calibration. Take for example a software-only calibration where the white point is changed from the native display white point. Because most display systems are 8-bit, they can output RGB values from 0 to 255 with (0,0,0) being black and (255,255,255) being white. If the display's native white point is too blue, after calibration where the white point it set to be redder, now your computer will send out, say, (255,245,235) for white. In other words, there are only 245 steps of G left and only 235 steps of B available, so there will be banding in what should be a smooth gradation of G or B. Plus it's not possible to create a true gray for all luminosities. Take a 75% RGB value. For the example white point, the RGB values would be (191,183.5,176). Of course there's no such thing as an integer 183.5, so the actual value would be 183 or 184 which would produce a slightly purple (183) or slightly green (184) gray.
Some third-party displays let you adjust the color on the monitor, but this must be done manually as part of the software calibration and the amount of control is rather limited. For example, the Eizo FlexScan EV2436W allows you to set brightness, color temperature (white point), gamma, and gain of each color to fine-tune white point. This will allow you to create a more accurate calibration than a software-only calibration, but it is labor intensive and still isn't as good as true hardware based calibration.
True hardware based calibration automatically couples the display's hardware to the calibration process. Instead of having a small set of color controls to augment software-based calibration, there's an extremely detailed look-up table that the display uses to adjust the full 0-to-255 signal for each RGB value into the correct color. This allows the display to create a true gray for any luminosity and also create more accurate colors throughout its color gamut. Current high-end displays, including the Eizo ColorEdge CG246, use a three-dimensional look-up table so that each RGB triplet is specially adjusted to provide even higher color accuracy.
Because I have a rather small desk in my RV and use my mid-2010 17-inch MacBook Pro with a matte display as a second monitor, I was looking for a 24-inch display. Actually, I'd love to have a 20- or 22-inch square display so that landscape-orientation and portrait-orientation images could be displayed the same size without having to rotate the display. I narrowed my selection to the Eizo ColorEdge CG246 and the NEC MultiSync PA242W-BK. They have very similar color performance, but the NEC is about half the cost because it doesn't have a built-in SelfCalibration sensor like the Eizo. I opted for the Eizo though because it uses about 75% as much power as the NEC, something that's important when boondocking and operating off of solar-electric power.
I'm still using my X-Rite i1Display Pro colorimeter instead of the built-in SelfCalibration sensor to calibrate the Eizo with the idea that the colors on the Eizo and my MacBook Pro will be closer if I use the same measurement device.
Let me tell you, the color on the Eizo ColorEdge CG246 Monitor is awesome! The grays are extremely neutral and it makes my software-calibrated MacBook Pro display look awful.
This test image from P.L. Anderson can really point out problems in your monitor calibration. It's designed for a monitor calibrated with a gamma of 2.2. (If you have your monitor calibrated for a different gamma, see the other test image links near the bottom of this page.) If you sit back from your display and squint at the image, each gray strip of the image will be a uniform gray for a properly calibrated monitor. If there are problems with the calibration, various squares will be visible. (Note that the image will only display properly without scaling, so if you're on a Mac try hitting "Command -" or "Command +" to see if the image looks better before deciding that your calibration's off.) The Eizo CG246 shows nice uniform gray strips, but my software-calibrated MacBook Pro shows squares in each gray strip.
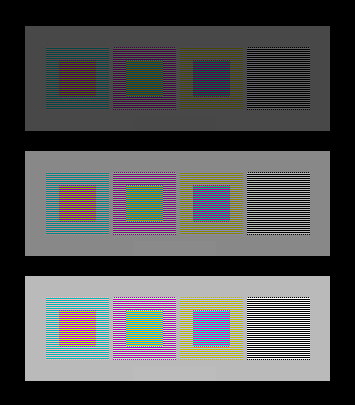
The test image can also be used to evaluate the effects of off-angle viewing. It's amazing how sensitive the MacBook Pro screen is to viewing angle because the squares change with every slight movement of my head. On the Eizo, if I sit at one side of the display, with my head much closer to the display than usual, there are only subtle squares when looking at the other edge.
The test image can also be used to evaluate monitor warm-up time. Most monitors take about 30 minutes to stabilize after they're turned on, and Eizo touts that their CG246 takes only 7 minutes. When waking the Eizo after it has slept overnight, I can see squares in the test image and after 6.5 minutes they're gone.
Tour: Kenya in October 2014
On Sale! Register before November 25, 2013 and save 15%.
Join me for a 20-day photo safari to Kenya in October 2014 where we will visit three parks and witness the wildebeest migration. The trip will begin with four days in Samburu National Reserve where we will see the unique gerenuk, reticulated giraffe, Biesa oryx, and Grevy's zebra and have good opportunities for cheetah, elephant, and leopard. Then we will spend two days at Lake Nakuru National Park where we will see flocks of thousands of lesser flamingos and also Rothschild's giraffe and white rhino. Then we will spend 12 days in Masai Mara National Reserve to witness the wildebeest migration and see Masai giraffe, black rhino, and common zebra, along with cheetah, elephant, leopard, and lion. We will spend those 12 days in the Mara in three different areas of the large park to minimize travel time and increase shooting time, and there will only be three photographers per 7-passenger Land Rover to facilitate shooting and carry our gear.
Tour: Gorillas in October 2014
On Sale! Register before November 25, 2013 and save 15%.
Join me for an awesome photo safari to East Africa in October 2014 to see and photograph mountain gorillas. This safari will be unlike most other African safaris because all of the photography will be done on the ground after hiking to the subjects. It's a wonderful experience to be in close proximity to these close relatives of ours in their natural habitat. The safari is scheduled to mesh with the Kenya in October 2014 safari, so join me for both to make the most of your air travel to Africa.
Travel: Oregon
We started out in the second week of September with a week near Crater Lake National Park. We had some nice clouds on our first night, but they were almost too thick. Fortunately, there was a gap on the western horizon that let in some color at sunset (below left). Then it was mostly clear for a few days with only scattered clouds on the sky. Some of the clouds could be used to make an interesting composition (below right), but mostly conditions weren't very good for grand landscape photography.


One way to turn lemons into lemonade, or a mostly clear, boring sky, into a nice image, is to create a starburst. Here (below left), I captured the sun rising over the crater rim and the starburst adds some interest to an otherwise unremarkable composition. I used a 2-stop hard graduated neutral density (ND) filter to help balance the exposure of the sky and the rest of the image and 5 exposures 1-stop apart combined using the Lightroom HDR technique to bring out detail from the extremely bright sun to the quite-dark foreground. Another morning the clouds were almost too thick. There was a mostly-solid cloud layer to the east as I drove to my favorite overlook to check conditions, and I drove through a layer of clouds as I ascended the crater rim. I sat and waited, and the clouds over Crater Lake parted just enough to create a fantastic glow shortly after sunrise (below right). I combined the five exposures by hand because Photoshop didn't create a smooth image during the Merge to HDR Pro stage of the Lightroom HDR technique.
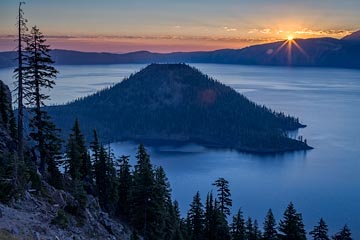
1/60, 1/30, 1/15, 1/8, & 1/4 sec; f13; ISO 100
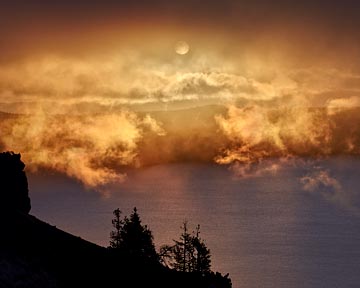
1/1500, 1/750, 1/350, 1/180, & 1/90 sec; f13; ISO 100
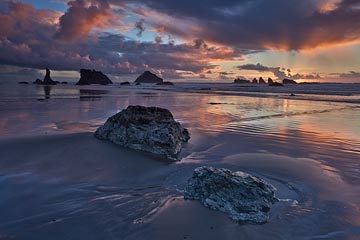
Then we moved over to the coast and spent three nights near Harris Beach then three nights near Bandon Beach. The weather wasn't very cooperative most of the time, but the clouds did light up nicely one morning at Bandon Beach (below left).
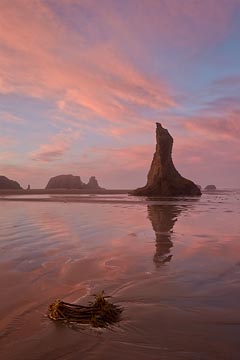
0.7 & 0.3 sec, f11, ISO 100
6 sec, f13, ISO 100
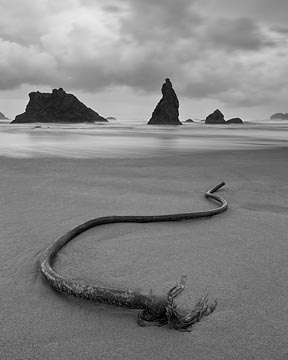
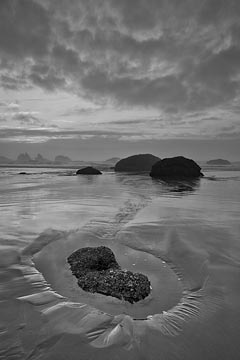
We spent a few days at an RV park near Florence to have relatively cheap camping with electric hookups for several rainy days. Then I headed back to Bandon Beach for another week and Jan continued up the coast. There were interesting clouds many of the days I was back at Bandon Beach, but not very much color at sunrise or sunset. By concentrating on a strong composition and minimizing the amount of sky, I was able to make some nice black-and-white images (above right and below left). Finally, one evening the clouds lit up again and I was able to make a nice image as some storm clouds moved in over the beach and opened up the horizon to the west (below right).
1/10 & 1/6 sec, f11, ISO 100
2-stop hard grand ND, 2-stop soft grad ND,
1/6 sec, f11, ISO 100
I met up with Jan in Seaside in northwest Oregon in early October and we spent nine days there while visiting nearby Ecola State Park. My favorite place to photograph is below Ecola Point, and access to the beach there is from Cannon Beach. There was spectacular color on the contrails directly to the west on the first night, so I looked for an interesting composition that had more natural-looking clouds. That's this view (below left) looking more or less south along the beach. Unfortunately, the walk along the beach is rather long and can only be done at low tide. By the time the weather was good again for photography, the tide was too high at sunrise and sunset to reach the beach at Ecola Point, so I photographed at Indian Beach which is easy to access no matter what the tide. My favorite image from there was taken after sunset, and by using a neutral density filter to make the exposure even longer, the waves coming in among the rocks turned to a smooth surface (below right).
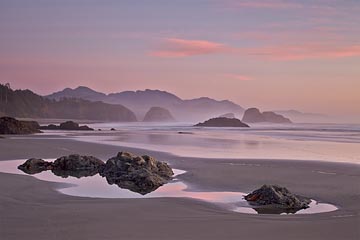
2-stop hard grad ND, 2-stop soft grad ND,
4 sec, f9.5, ISO 100
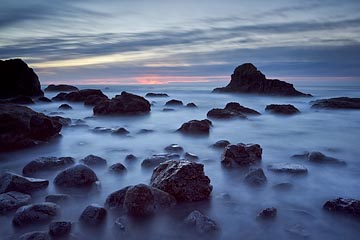
2-stop hard grad ND, 2-stop soft grad ND, 6-stop ND,
1.5 min, f9.5, ISO 100
One afternoon, there were nice puffy clouds above the beach way before sunset, but I was able to work with them and the small pebbles on the beach as the tide was going out (below left). There weren't any interesting clouds the next morning, so I focused my attention on the pebbles them selves, and I was drawn to these two pebbles with a blade of grass caught between them (below center). The last interesting image I made in Ecola State Park was at dawn. The tide was high so it flowed through the many rocks along the beach and the foam helped create a pattern in the water (below right). This image was made before I received the Lee Filters Lens Adapter Ring Canon 17mm TS-E, so I used my DIY SW150 filter holder for 6-inch filters.
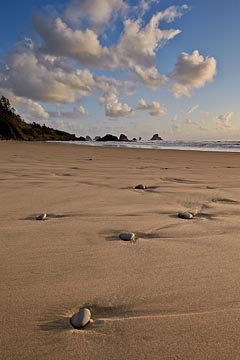
2-stop hard grad ND,
1/30 sec, f11, ISO 100
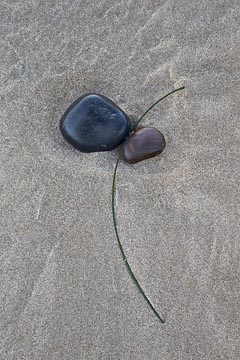
1/4 sec, f13, ISO 100
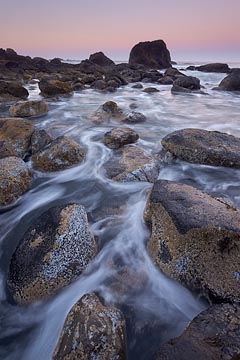
2-stop hard grad ND,
2 sec, f11, ISO 100
Then we moved to the Columbia River Gorge in mid October for 10 nights. We wanted to photograph the many waterfalls along the gorge with fall color, and we timed it just about right. Our first visit was to Fairy Falls which has some nice cascades not too far downstream (below left) and the falls them selves are nicely tiered (below right).
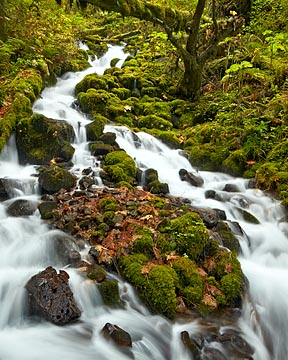
1 sec, f11, ISO 200
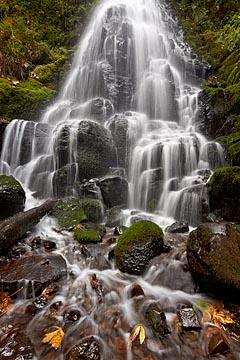
1/2 sec, f13, ISO 100
Unfortunately, I broke a toe while hiking up the steep path to the falls while wearing only my gum boots which don't provide much support. I had broken it while in Iceland under similar circumstances, and had been stressing it since reaching the Oregon coast when I had been wearing my gum boots so I could stand at the edge of the surf and not have to worry about the waves. So, I moved on to Plan B: photographing the fall color from the roadside where I wouldn't have to hobble too far from the car. I spent most of that time in the Mt. Hood National Forest south of Hood River. The vine maple (below left); bigleaf or Oregon maple (below right); Garry, Oregon White, or Oregon oak; and western larch were peaking while we were there.
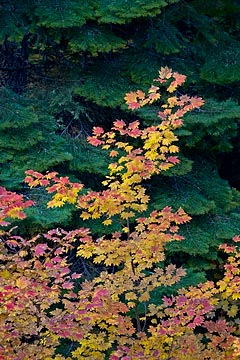
2 sec, f11, ISO 100
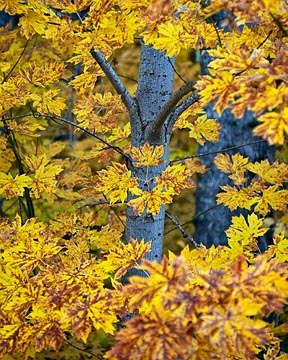
1/8 sec, f4, ISO 100
We're currently hanging out in another commercial RV park with electricity while waiting for my toe to mend and the weather to be good for the Olympic Peninsula. I'll tell you about that next time.
Take care and happy shooting.
— James
James Hager Photography :: www.jameshagerphoto.com

