

JHP Newsletter - 2012, No. 4, 27 November
Greetings from Elephant Butte Lake State Park, New Mexico. I'm taking a break from shooting to get caught up on office work after a productive fall season.
Equipment: Canon EOS 1D X
After using the Canon EOS 1D X almost daily for the last two months, I've come to love it. The Kirk L-Bracket covers up the protruding accessory flap hinge and the grip has become comfortable. (When I used my 1D Mk IV recently, the tiny grip felt odd and the buttons on the rear were all in the wrong position.) It's also great to be able to switch between 3, 2, and 7 bracketed images. I've been using the level on the rear LCD, straight and imposed on the Live View image, and I have mixed feelings about it. When it's used straight, I usually have my eye close to the body because I've just been looking through the viewfinder and my eyes have a hard time focusing on it. When it's superimposed on the Live View image, it's really small and is hard to level the camera. I was so frustrated early on that I reverted to using my three-axis bubble level for a while, but got tired of messing with that accessory and have been working around the limitations of the rear-LCD level.
Equipment: f-stop Satori EXP and Large ICU
You might have heard about the unique photo backpacks produced by f-stop. They have a range of backpack units that accommodate separate ICUs (Internal Camera Units) for camera gear. The backpacks are designed like regular backpacks for backcountry use so they're light weight, streamlined, and very comfortable. Another big feature that makes them good for photographers is that the access to the camera gear is through the panel that rides against your back. So, when you take off the pack and set it on the ground, you place it down on the side of the pack that doesn't touch your back. So, if the ground is wet or sandy, the panel that goes against your back stays clean.
I had been reading these great things about the f-stop bags so I bought a Tilopa pack and a Large ICU (Internal Camera Unit) about a year ago. The ICU was about 1.5 in (4 cm) narrower on the inside than the LowePro Pro Trekker AW pack I had been using for years, and I couldn't figure out how to get my gear in the ICU. Plus, there wasn't much space left at the top of the pack to carry clothes and water, so I returned everything.
My interest in f-stop bags returned when I had to be very careful with my LowePro pack while photographing in Goblin Valley State Park to keep the sand off the part of the pack that goes against my back. Then I saw an f-stop pack up close and personal in Arches National Park, and I decided to give f-stop another try. I ordered a Satori EXP pack which is a bit taller than the Tipola that I had before. The Tipola was the largest pack that I could fit in our towed vehicle at the time, and I made sure that a Satori EXP would fit in my new towed vehicle. :) Another factor was that the revised f-stop website indicated that the ICUs are now about 1 in (2.5cm) wider than they were a year ago. Well, when I opened up the new Large ICU, it was the same width as last year. :( Fortunately, the ingenious loading system I had developed through a CAD drawing still worked — almost. The space between the metal stays in the pack is about 1 in (2.5cm) narrower than the inside of the ICU at the top of the rear access panel, so I couldn't get my gear into or out of the ICU with it in the pack. However, by turning the layout upside down, I was able to get my gear into and out of the ICU with it in the pack. The image below shows how I fit the following gear:
- TS-E 90mm f2.8 with stacked EF12 and EF25 extension tubes below it in the top row left
- TS-E 24mm f3.5 L II in the top row center
- EF 24-105 f4 L IS USM in the top row right (now shown as it was attached to my 1D Mk IV to take the images)
- EF 1.4x III extender with Hoodman HoodLoupe 3.0 below in the middle row left
- TS-E 17mm f4 L in the middle row center
- 1D X in the bottom row left
- EF 70-200mm f2.8L IS II USM in the bottom row right
Note that I didn't consider carrying my EF 180mm f3.5 L Macro USM in the ICU along with the 70-200. I'll usually only have one of those long lenses with me, and if I really need both then there's space to carry one of them in a separate padded case above the ICU.

The left side of the image shows how I load the Large ICU with a small lens (here the 17 TS) attached to my 1D X body and the right side shows the same gear but with a 70-200 f2.8 IS II attached to the body. The ingenious part is that the blue and yellow parts of the dividers are free to float around and make switching form the short attached lens to the long attached lens a sinch. Oops … I think I just pulled something while patting myself on the back. :) The red, green, and blue pieces are part of one divider, and the red and blue parts (the ends) have velcro at the edges and the green part has velcro on the bottom. I used the velcro of the blue section and the velcro of a small divider (yellow) to make the free-moving flap. The second piece of velcro on the yellow part is turned back onto the yellow section so it won't catch on anything. The red section helps keep the eye piece from getting crushed. Note that there's room when the 70-200 is attached for a short lens on the right side of the middle row, so I'll be able to carry the TS-E 45mm f2.8 II when Canon releases it. :)
The Satori EXP is very comfortable! The pack and Large ICU not only weigh a lot less empty than the LowePro Pro Trekker AW, but the camera gear is only about 0.5 in (1.3cm) away from my back whereas it was about 1.5 in (4cm) away with the LowePro. This puts the weight closer to my natural center of gravity so I can stand up straighter while wearing the pack.
If you've been thinking about getting a new backpack to carry your camera gear, I can highly recommend the f-stop packs.
Technique: Using Lightroom to Create HDR Images
I've recently started using Adobe Photoshop Lightroom to create realistic HDR images from a bracketed series of captures instead of blending complex scenes by hand. It works with Lightroom v4.1 or latter and is based on developing a 32-bit image.
The following is an image from Grand Staircase - Escalante National Monument made from 7 images in 1.5-stop increments (Canon EOS 1D X; 24 TS II; 1/3000, 1/1000, 1/350, 1/125, 1/45, 1/15, & 1/6 sec; f16, ISO 100). It was really convenient to capture this sequence of images with the 1D X set up for a bracket series of 7 images with high-speed motor drive. Because the latter, longer exposures were a significant part of a second, I couldn't capture all frames at 12 frames per second, but it sure was convenient to capture them all in one swoop within about two seconds because I just had to hold down the cable release, plus items in the scene didn't have much chance to move far in that short time.

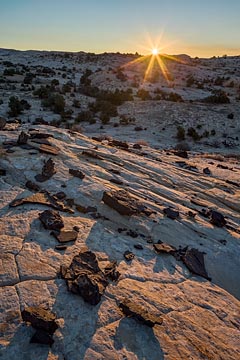
The image on the left was created by blending the seven (7) frames by hand in Photoshop and the image on the right was created using the Lightroom 32-bit HDR technique. Ignore the difference in white point, and look at the sunburst. The hand-blended image is a bit muddy right around the sun and the top rays are less distinct compared to the Lightroom HDR image. Plus, it took me about 30 minutes to blend the frames by hand, and it only took about 5 minutes to perform the Lightroom HDR technique.
Here's how to perform the 32-bit HDR technique if you regularly use Lightroom.
- Set up Lightroom to do external editing in Photoshop using TIFF files: Preferences… > External Editing (tab)
- Import the bracketed photo series RAW files into Lightroom
- Select the bracketed photo series RAW files then select Photo > Edit In > Merge to HDR Pro in Photoshop…
- Wait for the images to load into Photoshop CS6
- Click the "Remove Ghosts" box, set the Mode to "32 Bit", then click "OK"
- Wait for Photoshop to create the 32-bit file
- Select File > Save and the file will automatically be put into the Lightroom catalog
- In Lightroom, select the 32-bit file then go to the Develop module
- Use the Exposure, Highlights, and Shadows sliders to develop the file w/o worrying about the typical HDR tone mapping controls
- Be amazed by the natural-looking results!
Here's how to perform the 32-bit HDR technique if you only want to use Lightroom to do the HDR part.
- Set up Lightroom to do external editing in Photoshop using TIFF files: Preferences… > External Editing (tab)
- In Bridge, select the bracketed photo series RAW files, or already-processed TIFF files, then select Tools > Photoshop > Merge to HDR Pro…
- Wait for the images to load into Photoshop CS6
- Click the "Remove Ghosts" box, set the Mode to "32 Bit", then click "OK"
- Wait for Photoshop to create the 32-bit file
- Select File > Save As… and save a 32-bit TIFF file
- Import the 32-bit file into Lightroom
- Select the 32-bit file then go to the Develop module
- Use the Exposure, Highlights, and Shadows sliders to develop the file w/o worrying about the typical HDR tone mapping controls
- Be amazed by the natural-looking results!
- Export the image to Photoshop by selecting Photo > Edit In > Edit in Photoshop CS6…
I prefer the latter method because I don't regularly use Lightroom and I can store the 32-bit TIFF file created by Photoshop in the Merge to HDR Pro step where I usually put images that are being processed instead of with the RAW files which is where Lightroom places it.
Travel: Colorado Fall Colors
We were in the San Juan Mountains of southwestern Colorado from the middle of September through the first week of October to photograph the fall colors. The color was about a week ahead of usual, and we were there in plenty of time to get the peak color.
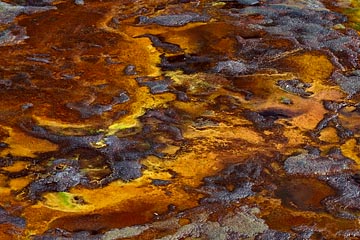
polarizer, 0.3 sec, f11, ISO 100
polarizer, 1/30 sec, f11, ISO 100
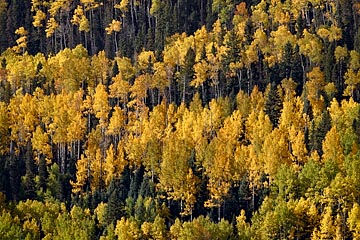
While scouting the area when we first arrived, we stopped to photograph the interesting colors in a small wetlands covered with algae (above left). A polarizer reduced the reflections from the water and really let the color come through. I also used the 1.4x III extender for the first time with the 90 TS to get a little more reach and was quite pleased with the results. A few days later, large parts of the hillsides started to get some nice color (above right) and I used the 70-200 to extract a small section. I used the 70-200 for the vast majority of my images because the conditions favored such extractive compositions.
70-200 2.8 IS II (at 168mm),
1/125 sec, f11, ISO 100
70-200 2.8 IS II (at 175mm), polarizer,
1/90 sec, f8, ISO 100
70-200 2.8 IS II & 1.4x III (at 280mm),
polarizer, 1/45 sec, f11, ISO 100
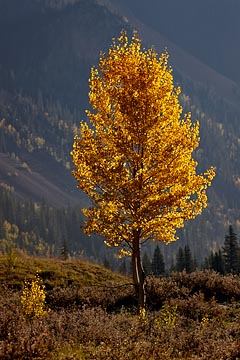
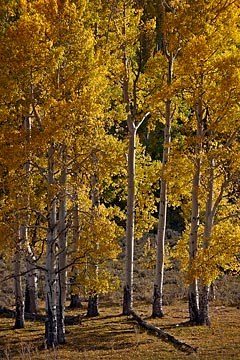
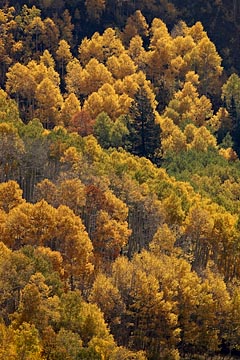
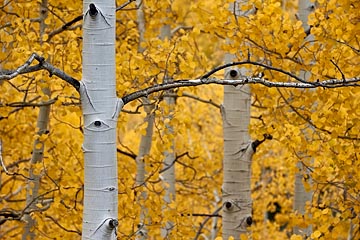
Aspens in the fall take on a wonderful glow when they're backlit. In the image above left, I isolated a lone backlit aspen against a dark background to help it stand out, and in the image above center I liked the trunks and fallen leaves. Backlighting can also make a hillside look interesting (above right).
70-200 2.8 IS II (at 168mm),
LBW polarizer, 2-stop soft grad ND,
1/90 & 1/45 sec, f8, ISO
LBW polarizer, 3-stop ND,
8 sec, f11, ISO 100
180 Macro, polarizer,
0.3 sec, f9.5, ISO 100
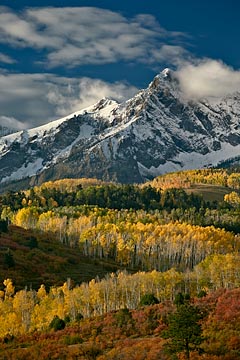
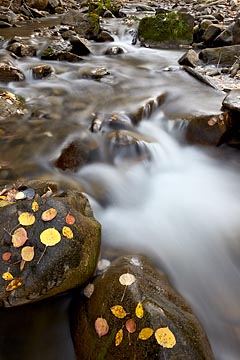
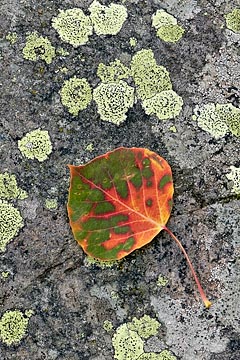
The weather wasn't very cooperative most of our time there with either a clear sky or nearly-solid clouds. However, we got a nice snowstorm and when it cleared there were a few nice clouds left to photograph the Sneffels Range. Mears Peak (13,441 ft or 4097 m) is one of my favorite subjects because of the zigzag pattern of aspen in the foreground. Later, had a ball photographing the cascades along Big Bear Creek for a few days. The creek runs up a narrow, steep-sided valley that keeps the creek in the shade for a long time in the morning and afternoon, and the diffuse light is perfect for photographing cascades (above center). I used a polarizer to increase the reflections on the water and a 3-stop ND (neutral density) filter to lengthen the exposure to get the silky look to the moving water. I found several fallen aspen leaves that had interesting coloration and enjoyed photographing them (above right).
polarizer, 1/60 sec, f8, ISO 100
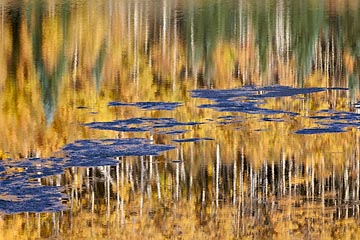
polarizer, 1/20 sec, f11, ISO 100
Aspen trunks surrounded by the yellow leaves of the forest can be interesting subjects (above left). I was drawn to this area early on, but it took several days to get a morning with diffuse light to make the composition work. Reflections can provide interesting swaths of color, and even pond scum can add something to a composition (above right). Note that I used a polarizer to increase the reflections on the water and that also increased the reflections off the pond scum thus giving it a blue cast.
Travel: Southern Utah
I was on a three-week quest for fall color and clouds in southern Utah from late October to mid November.
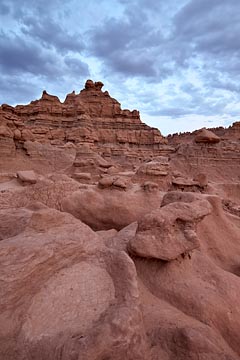

The first stop was Goblin Valley State Park where the clouds were almost too thick when I arrived. However, shortly after the sun set, the clouds became interesting and provided a nice background for the badlands (above right). The next morning the clouds had thinned out and were quite photogenic behind a group of goblins, as the hoodoos are called in the park (above right). I used the 17 TS to exaggerate the size of the hoodoo in the foreground and encompass a lot of sky, and I used the shift motion to look up without making the hoodoos look like they would fall over.
1/15 sec, f11, ISO 100
1/45 sec, f11, ISO 100
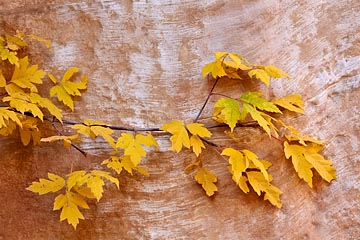
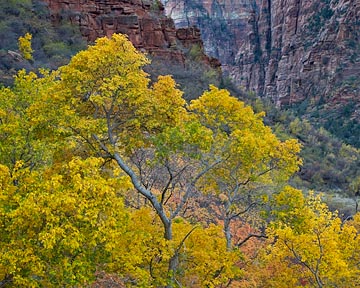
The clouds at Goblin Valley cleared out so I moved down to Capitol Reef National Park. I was a little early for the cottonwoods but found a perfect boxelder maple branch against a gorge wall (above left). The clouds weren't good in Capitol Reef either, so I left after just two nights and went to Grand Staircase-Escalante National Monument and explored the Hole In The Rock Road for the first time. There weren't any deciduous trees or good clouds, so I left after two nights and went to Zion National Park.
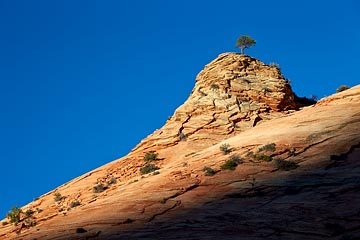
Zion National Park is a fantastic place because there's so much to photograph. The eastern part of the park is comprised of sandstone hills and valleys with pines and maples. It was mostly clear when I was there so I tried to photograph scenes that didn't include the sky. Of course I made an exception for the image above right that was made as the sun was rising above a nearby hill.
70-200 2.8 IS II (at 142mm), polarizer,
0.3 sec, f11, ISO 100
70-200 2.8 IS II (at 200mm), polarizer,
0.7 sec, f13, ISO 100
1/10 & 1/6 sec, f11, ISO 100
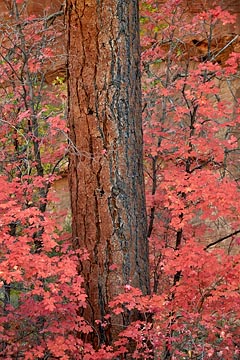
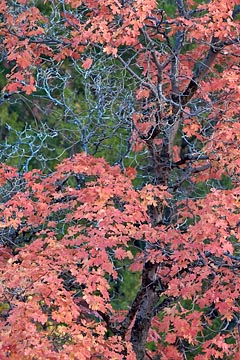
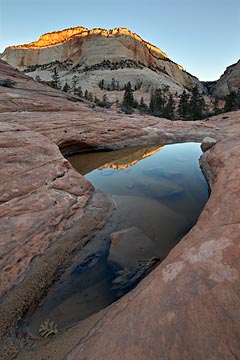
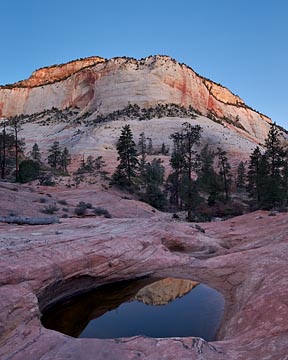
The maples in the eastern part of the park were near peak when I arrived at the end of October, and I thoroughly enjoyed photographing the red and orange leaves (above left and center) after photographing so may yellow leaves in Colorado. I explored a new part of Zion on this visit and found a string of pools in the sandstone with water in them. Because there weren't any clouds, the best time to photograph them was at dawn and dusk, and I kept returning at those times to photograph different compositions when the light was at its best. In the image above right, the sun is just starting to illuminate the top of the hill in the background which helps its reflection stand out. In the image below left, the sun was still well below the horizon and the hill in the background was mostly illuminated by a near-full moon.
polarizer, 2 sec, f11, ISO 100
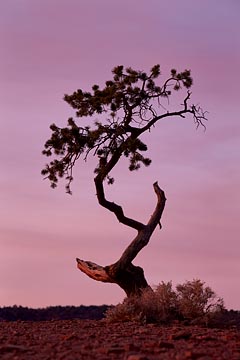
Because the maples had peaked and there weren't any clouds or any clouds forecast, I returned to Capitol Reef National Park to see if the cottonwoods were ready. They weren't. Some of the trees were a mix of green and yellow leaves, other trees were a mix of yellow and brown leaves, and others were all brown or starting to get bare. This wasn't a good year to photograph cottonwoods in Capitol Reef. The clouds cooperated at sunrise one morning and I was able to capture a crazy tree against the wonderful purple/pink sky (above right).
1/8 sec, f11, ISO 100
Utah, USA
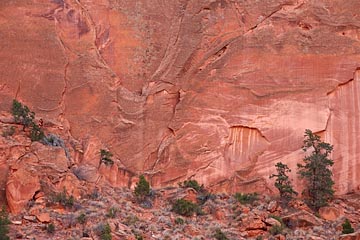
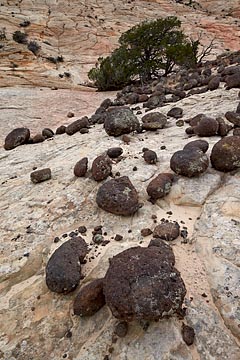
I returned to the Long Canyon area of Grand Staircase - Escalante National Monument at the beginning of November and there was some color in the canyon. However I mostly photographed the red sandstone walls of the canyon and the contrasting pines (above left). I also spent a lot of time photographing the white Navajo sandstone hills near Boulder. I really enjoyed the contrast between the volcanic boulders and the white Navajo sandstone (above right). I also thoroughly enjoyed dinner at the Hell's Backbone Grill that is part of the Boulder Mountain Lodge. It's an organic farm-to-table restaurant that Jan and I stumbled across two years ago.
0.5 sec, f8, ISO 100
1/8 sec, f8, ISO 100
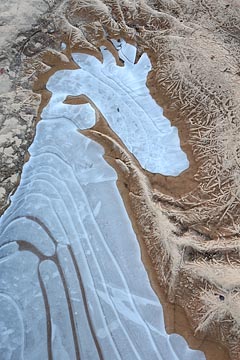
I returned to Zion National Park in early November hoping to catch the peak color down in the main valley. I was a little early, but was able to make a nice image of a mostly-yellow boxelder maple with the canyon walls in the background (above left). While walking through tall grass and stepping over downed branches to make that image, my left knee got a real workout and was sore when I returned to the RV so I decided not to hike up The Narrows of the Virgin River like I was planning because that hike is mostly in the river with shin- to thigh-high water over an uneven bottom that would really tax my knee. The colder temperatures this time froze the pools that I had discovered the previous week, and the recent rain formed some smaller pools in the sandy depressions upstream of the pools. The small pockets of water and the saturated sand formed some really interesting formations when they froze (above right). I'll leave it as a Rorschach test to see what you make of the forms in the image.
Travel: Vermillion Cliffs National Monument, Arizona
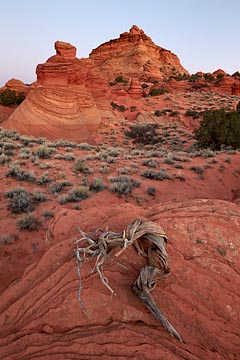
In the middle of November I returned to Vermillion Cliffs National Monument in northern Arizona to complete the visit that was cut short in February when I hurt my knee. I started with a visit to South Coyote Buttes and entered through the Paw Hole Trailhead where we had gone before. It was clear in the morning, but the dawn light created a nice warm glow on the sandstone (below left). I explored more of the area than I had back in February and even returned to the dangerous hill where I had injured my knee. My knee did fine hiking through the sand and over the sandstone.
National Monument, Arizona, USA
1.5 sec, f11, ISO 100
National Monument, Arizona, USA
70-200 2.8 IS II (at 168mm),
polarizer, 1/16 sec, f11, ISO 100
National Monument, Arizona, USA
1/45 sec, f11, ISO 100
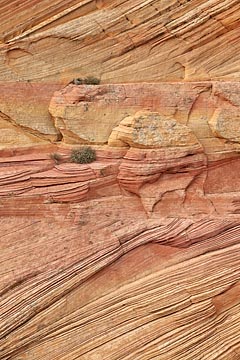
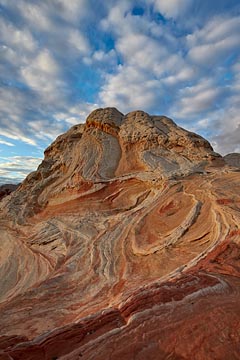
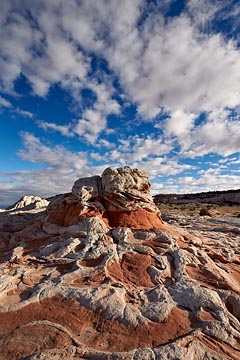
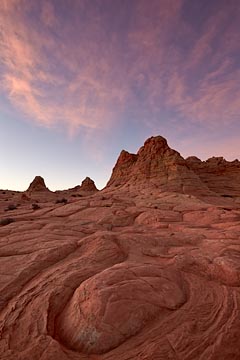
The next day I entered South Coyote Buttes from the Cottonwood Cove Trailhead for the first time, and it was really exciting to explore that area. It's much larger than the area around Paw Hole and there is a lot more to photograph. There was a nice thin cloud layer in the afternoon that was perfect for photographing some of the sandstone layers (above center). Then I went to White Pocket for the first time, one of the areas we wanted to visit in February but didn't. It's a small area but has lots of interesting formations created from white and red sandstone. The clouds were very cooperative for the two days I spent shooting there (above right and below left).
National Monument, Arizona, USA
1/180 sec, f11, ISO 100
National Monument, Arizona, USA
1/90 sec, f11, ISO 100
National Monument, Arizona, USA
1/4 sec, f11, ISO 100
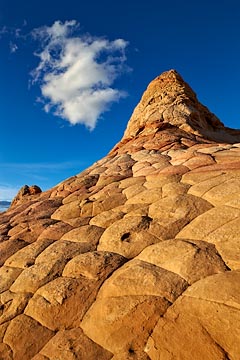
I spent two more days in South Coyote Buttes from the Cottonwood Cove Trailhead, and the clouds were fairly cooperative (above center and right). It was great way to finish up shooting.
Take care and happy shooting.
— James
James Hager Photography :: www.jameshagerphoto.com

