

JHP Newsletter - 2011, No. 5, 24 October
Greetings from Parker, Colorado, our unofficial home base. A lot has happened since the last Newsletter, so this will be longer than usual.
Equipment: Gloves
Fall means cooler weather, and in order to keep shooting, gloves that are photographer friendly should be part of your gear. If you're cold, or even worse can't feel your camera, you're likely not going to enjoy being out and photographing all that fall and winter has to offer. I use two kinds of regular gloves that are photographer friendly, that is, they allow me to operate my camera while wearing them.
The SealSkinz Ultra Grip Gloves are a great light- to mid-weight glove. They have a waterproof, breathable membrane which stops the wind and makes these gloves particularly warm. Grip dots are on the fingers and palms to provide a sure grip, and the gloves are fairly thin which provides great dexterity. It's quite easy to change a CF card with these gloves. They come in olive drab or black so they're rather low key. The original SealSkinz Waterproof Gloves are similar and have grip dots that are sufficient for photography and driving, but they only come in black.
The North Face Denali Gloves are a great heavy-weight glove. They're made of 300-weight fleece and have polyurethane pads on the finger tips and palm for a good grip and good dexterity. It's a bit cumbersome to change a CF card while wearing them, but operating the camera controls is easy. The gloves are cut so that the fingers are pre-curved for a comfortable fit.
Equipment: Singh-Ray LB Warming Polarizer
I've started using a Singh-Ray LB (lighter, brighter) Warming Polarizer in the Cokin Z-Pro Sprocket Mount with my Lee Filters Foundation Kit. It's much more convenient to adjust the polarization with the filter in the filter holder rather than with a screw-on polarizer between the lens and the wide-angle adapters for the Foundation Kit.
Equipment: Canon TS-E 17mm f4 L
I finally broke down and purchased a Canon TS-E 17mm f4 L after eyeing the great lens since its introduction in 2009. The lens provides fantastic image quality from corner to corner, easily surpassing the Canon EF 16-35mm f/2.8L II USM and EF 17-40mm f/4L USM. The tilt motion on this lens is not as critical as on the other Canon tilt/shift lenses because the depth of field for such wide-angle lenses is so great to begin with. The shift motion, however, is worth its weight in gold. Most people think of using the shift feature with architectural photography so that, say, the view can be pointed up without creating visible keystoning (lines converging towards the top of the image). Few people think to use the shift motion for nature photography because they think there are no such obviously vertical lines that should stay vertical in the image. What they're forgetting is that most trees grow more or less vertically and erosion patterns on cliff faces are generally vertical. In other words, I love being able to frame my wide-angle images, in conjunction with the shift motion, to get the image I want. Most times that means no, or very little, keystoning, because that produces an image that looks natural without the typical wide-angle look to it.
One of the drawbacks with this lens is the bulbous front element that prevents the use of traditional filters. After discovering a DIY solution using a Cokin X-Pro filter holder, I developed my own DIY solution to mount a Lee Filters SW150 Filter Holder designed for the AF-S Nikkor 14-24mm f/2.8G ED lens. You can read about it on my blog entry for August 18, 2011. Now I can mount neutral density filters on the lens which makes it much more useful for landscape work.
Equipment: Wacom Intuos 4 Graphics Tablet
I made the plunge and started using a Wacom Intuos 4 graphics tablet for image processing. While I had heard great things about Wacom tablets for years, I wasn't sure how the tablet would work with my two-monitor setup and I was quite comfortable and adept at using a mouse. I found that using the tablet with a two-monitor setup is practically a no-brainer because in its standard mode, the tablet is mapped to cover all of your monitor space, and it felt quite natural. However, when I first started using the tablet for actual work, it took a lot of concentration because I had to retrain my brain. Not only was there a switch from relative positioning and movement to absolute, but the absolute positioning was skewed by mapping the tablet to two monitors because more left-right screen real estate was packed on the tablet than top-down real estate, so a 45-deg motion on the tablet produces about a 30-deg motion on the screen. After using just the tablet for a day of processing, I switched to using either the tablet or the mouse depending on which device was easier to use for each task. Generally, brush-like tasks were easier with the tablet and menu and curve adjustments were easier with the mouse. After a week or two alternating between devices, I started using the tablet more and more. After using the tablet for about three weeks, I was using the tablet practically all the time, and I can't fathom doing image processing without the tablet. It was definitely worth the effort to learn how to use it.
I have a medium tablet which has eight programmable buttons and a scroll wheel on the side. I was originally excited about the programmable buttons because tool selections can be assigned to them, but I don't use them. Instead, I'm using the standard Photoshop single-key tool selection that I never used before. I do like the scroll wheel because it provides a faster way to change the brush size than by using the bracket keys on the keyboard.
I particularly like the control provided by the stylus. I have the pressure-sensitive tip set to change the brush size, and it really speeds up dust removal because I can easily remove a single dead pixel or a typical dust spot without having to use the scroll wheel to change the brush size. I have the lower button on the stylus set to "Undo," and that's a really convenient way to to dust removal because practically all the controls are at my fingertips: stylus in one hand with an "Undo" button under a finger, and the scroll wheel to significantly change the brush size with the other hand.
Equipment: NIK Silver Efex Pro 2
I've started using NIK Silver Efex Pro 2 to process my B&W (black-and-white) images. After downloading and using the software in the trial mode, I was able to create a better B&W image with it than I could using my normal techniques within Photoshop. And this was after playing with it for only about 15 minutes! I was sold!
Technique: Using a Black-And-White Layer for Color Images
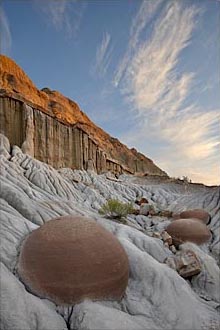
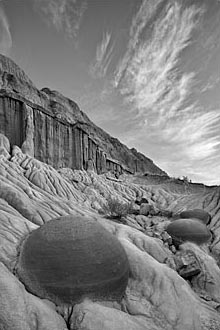
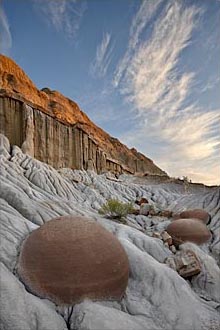
I've started processing my color images using a B&W (black-and-white) layer to enhance the image. Here's how I do it. After processing the color image as usual in Photoshop, I save the image just incase. Then I duplicate the image (Image > Duplicate...), flatten the duplicated image (Layer > Flatten Image), then run Silver Efex Pro 2 (Filter > NIK Software > Silver Efex Pro 2). I use the "000 Neutral" preset then move onto the Global Adjustments panel. I might adjust the overall brightness, then the overall contrast. The really useful controls are under Structure. I generally start by adjusting the individual regions (Highlights, Midtones, and Shadows), using values typically between 10 and 30%. Then I usually adjust the overall structure using a value typically between 5 and 15%. Then I might refine the contrast and brightness, in that order, until the image looks the way I want it. After clicking "OK" and waiting for Silver Efex Pro 2 to do its thing, the B&W later is now on top of the color background layer in my duplicated image. Then I select the Move Tool, hold down the Shift key, and drag the Silver Efex Pro layer from the duplicated image onto the original image. (Holding the Shift key will place the image/layer that your moving in the center of the destination image.) Now to combine the effects of the B&W layer, change the blend mode of the B&W layer to Luminosity to apply the tonality of the B&W image to the color image. The effect of the B&W layer will probably be too great, so I usually start by adjusting the opacity and then move onto masking to control the relative effect throughout the image.
In the images below, you can see the effect of the B&W layer on an image of Canon Ball Concretions in Theodore Roosevelt National Park, North Dakota, USA (Canon EOS 1Ds Mk III; 17 TS; 1/45, 1/20, & 1/10 sec; f8; ISO 100). The B&W layer really brings out detail in the clouds and the light gray dirt.
Travel: Idaho
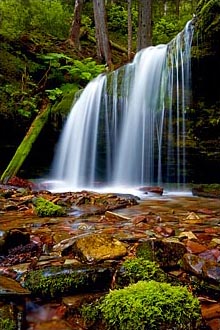
Back at the end of July, we were in northern Idaho exploring the Idaho Panhandle National Forests. We spent several mornings photographing the wildflowers just down the road from our boondocking spot in Kaniksu National Forest. One of my favorite images is of a Tiger Lily (below left). In the Coeur d'Alene National Forest, we thoroughly enjoyed the area around Fern Falls. We photographed Fern Falls on three occasions, and my favorite image of the falls includes a moss-covered rock in the foreground (below center). Nearby, I also photographed some cascades on Yellow Dog Creek (below right).
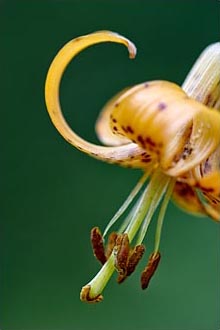
Idaho Panhandle National Forests,
Idaho, USA
polarizer, 0.3 sec, f5.6, ISO 100
Idaho Panhandle National Forests,
Idaho, USA
polarizer, 15 sec, f11, ISO 100
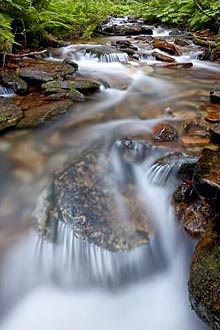
Idaho Panhandle National Forests,
Idaho, USA
polarizer, 3-stop ND,
20 sec, f11, ISO 100
At the beginning of August, we went to the Sawtooth National Recreation Area in central Idaho. On our way there, we spent the night near an osprey nest. The adults and fledged young were fun to photograph in the evening as they flew up and down the river, but my favorite image is from the next morning when I captured one landing on their nest (below left). The Sawtooth Range is a beautiful mountain range with nice jagged peaks that rise up from the valley floor. While I got some nice images of the mountains, my favorite image is from a morning when the mountains were obscured by dense fog. While waiting for the fog to clear, I photographed a bare tree growing in a marshy area.
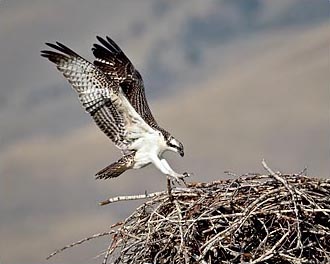
1/1500 sec, f8, ISO 320
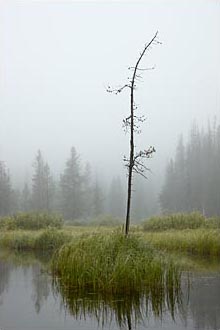
1/30 sec, f8, ISO 100
Travel: Beartooth Pass
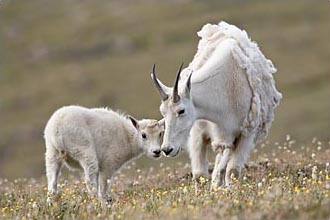
In mid August, we went up to the Beartooth Pass which is just northeast of Yellowstone National Park. It's a fantastic Alpine environment that's easy to access. It's also a good place to photograph Mountain Goats, but on this trip we didn't see any for the first four days we were there. Finally on the fifth day, we found a group of nannies and kids grazing among the wildflowers (below left). We also had some nice weather for landscape photography, and my favorite image is of sunrise at an unnamed lake (below right).
1/250 sec, f8, ISO 400
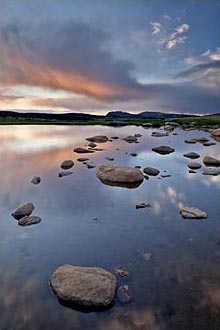
2-stop hard grad ND, 3-stop ND,
4 sec, f11, ISO 100
Travel: Glacier National Park
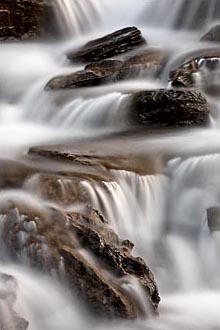
After a few days in Yellowstone National Park, we went to Glacier National Park at the end of August. Conditions weren't the best for landscape photography, but we had a ball exploring the Hanging Gardens area near Logan Pass (below left and center). There are lots of small streams with cascades, and there were still a lot of wildflowers due to the late snow melt this year. I used my new 17 TS for both of these images, and used a 3-stop neutral density filter for the first image to get a longer shutter speed to blur the water. I also enjoyed photographing the small cascades on Logan Creek (below right).
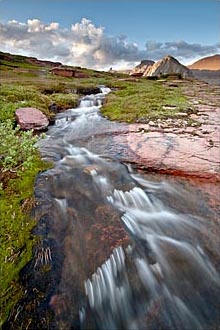
3-stop ND;
0.25, 0.7, & 2 sec; f11; ISO 100
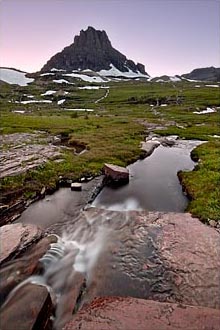
2, 4, 10, & 20 sec; f11; ISO 100
(at 155mm), LBW polarizer,
10 sec, f11, ISO 100
Travel: Yoho, Jasper, and Banff National Parks, Canada
After a few days in Waterton Lakes National Park and Banff National Park, Canada, we went to Yoho National Park for five nights in early September. It was the first time either of us had spent much time in the park, and we found some nice photo ops, especially along Kicking Horse River. I was drawn to the reflected light on the rocks along the river (below left) and practically ignored the standard tourist attraction nearby. I hiked to Ross Lake one morning. The lake itself was nice, but I thoroughly enjoyed all of the mushrooms and fungus that were growing along the trail. I found the pattern on the cap of a Dryad Saddle mushroom very interesting (below right). I had left my 180 Macro in the car to lighten my load, and of course I only ended up photographing macro subjects. Fortunately, I had my extension tubes with me, and they work well with the 90 TS.
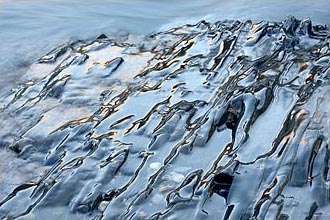
1/4 sec, f11, ISO 100
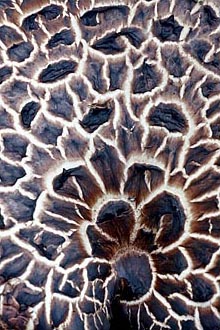
6 sec, f16, ISO 100
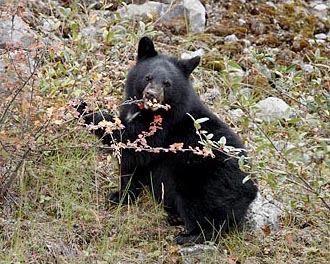
Then we went to Jasper National Park, Canada, for eight nights in mid September. Elk like the area around the Jasper townsite during the rut, and one morning we watched and photographed two bulls sparring (below left). It was early in the rut so they weren't going all out, but they still put on a good show. An other day, we found a very cooperative Black Bear sow with two cubs busy eating berries along the road. In the image below right, one of the cubs is eating some Canadian gooseberry berries.
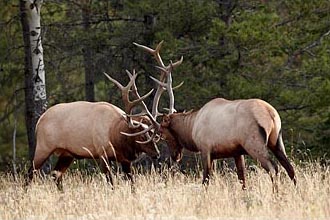
1/350 sec, f5.6, ISO 400
(at 200mm), 1/250 sec, f5.6, ISO 400
In the southern part of Jasper National Park, we stopped to photograph Tangle Falls (below left). The falls are very close to the road and drop in four main stages with some wonderful cascades in between. In extreme northern Banff National Park, I photographed the cascades along Nigel Creek one overcast morning (below center). One of my favorite locations in Banff National Park is Moraine Lake. It's less touristy than Lake Lousie, and I think the setting is more spectacular. The clouds were just breaking up after an overnight snow storm in the image below right.
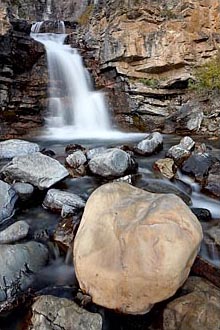
LBW polarizer, 3-stop ND,
3 sec, f11, ISO 100
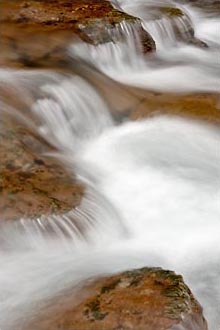
LBW polarizer, 3-stop ND,
1 sec, f11, ISO 100
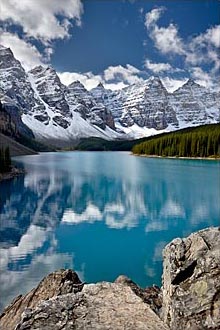
1/250, 1/90, & 1/30 sec; f11; ISO 100
Travel: Kananaskis Country and Dinosaur Provincial Park, Alberta
We spent five nights in Kananaskis Country towards the end of September. It's located in the Canadian Rockies just to the south of Banff National Park, and is composed of several provincial parks and natural areas. It was another first for us, and we instantly fell in love with the area. The scenery is just as nice as in Banff National Park, but there are many fewer visitors. We found a cooperative American Pika (below left) and Bighorn Sheep lamb (below right) near Highwood Pass in Peter Lougheed Provincial Park, Alberta.
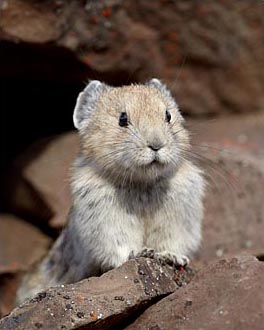
Kananaskis Country, Alberta, Canada
1/500 sec, f8, ISO 400
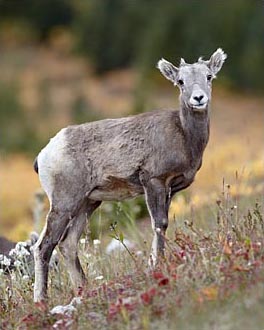
Kananaskis Country, Alberta, Canada
1/180 sec, f5.6, ISO 400
Conditions were good for landscape photography on two of our days in Kananaskis Country, and my favorite image is of an Alpine meadow after some fresh snow on the mountains (below left). It shows Smutts Creek, Commonwealth Peak (left), Pigs Tail or Sharks Tooth (center), and Mt. Birdwood (right).
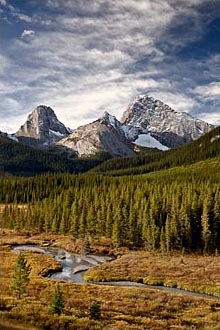
Kananaskis Country, Alberta, Canada
LBW polarizer, 2-stop soft grad ND,
1/30 sec, f8, ISO 100
Alberta, Canada
1/30 & 1/15 sec, f11, ISO 100
Alberta, Canada
1/2, 1, & 2 sec; f11; ISO 100
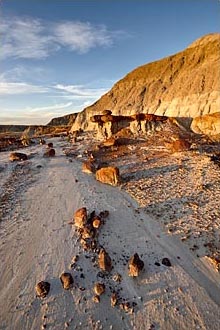
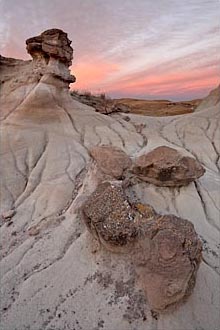
At the end of September, we spent two nights in Dinosaur Provincial Park, Alberta. It was another first for us, and we enjoyed the badlands that preserve a high concentration of dinosaur fossils. Unfortunately, most of the park is a Natural Preserve which means that it's off limits without a special permit. We photographed the badlands in the evening (above center) and the morning (above right).
Travel: Theodore Roosevelt National Park
Then we moved over to Theodore Roosevelt National Park in North Dakota at the beginning of October. We spent two nights in the North Unit and two nights in the South Unit. I had been there before, but it was a first for Jan. The area is similar to Dinosaur Provincial Park with badlands and mixed-grass prairie. We enjoyed photographing the Black-Tailed Prairie Dogs (below left) and the badlands (below right).
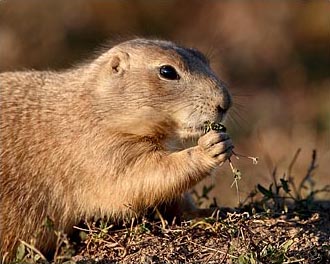
1/350 sec, f8, ISO 320
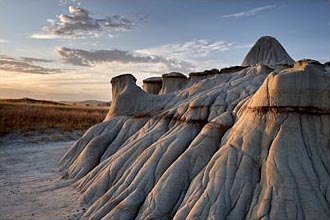
1/60, 1/30, & 1/15 sec; f11; ISO 100
Travel: Conata Basin and Black-Footed Ferrets
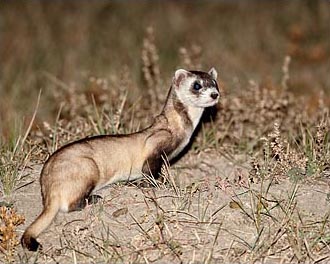
In early October, Jan was the guest speaker at the annual meeting of The Nature Conservancy - Western Dakotas Program in Rapid City. She was invited because her image of a Mountain Goat kid jumping across some boulders to reach its mother was selected to be on the cover of the The Nature Conservancy's 2012 calendar. As part of the special relationship, Jan arranged for the land manager of The Nature Conservancy to take us out to photograph Black-Footed Ferrets. Black-Footed Ferrets are the most endangered mammal in North America. (Pet ferrets are related to the European Ferret.) They were declared extinct in 1979, but a small population was discovered in 1987. A captive breeding program was established by the United States Fish and Wildlife Service, and ferrets were released back into the wild from 1991 to 2008. The Conata Basin of South Dakota is the home of the largest population of black-footed ferrets. They're nocturnal, so we went out when it was dark and used a spotlight to find the ferrets from their eye shine. We were fortunate to locate three individuals within a very short time — the first black-footed ferrets that Jan and I had ever seen.
The image below left is one of the first ferrets that we spotted, and it hadn't been marked by the wildlife biologist. The image below right is one I spotted on a subsequent night, and its neck has been marked by the wildlife biologist. The marker is from hair dye, and makes it easy for the people capturing the ferrets to determine that the ferret had already been transported to the small mobile lab for vaccinations, a blood sample, and a Frontline treatment, all to help prevent plague, before being returned to the spot where it was captured. It was a total thrill to photograph these rare animals. I used a Better Beamer attached to my Speedlite 550EX to extend the reach of the flash, and the flash was supported by a Wimberley F-1 Telephoto Flash Bracket with an M-6 extension to move the flash further off axis to reduce eye shine.
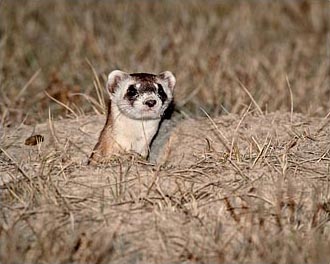
South Dakota, USA
1/180 sec, f8, ISO 320,
Speedlite 550EX, Better Beamer
South Dakota, USA
1/180 sec, f8, ISO 320,
Speedlite 550EX, Better Beamer
Travel: Custer State Park, South Dakota
On our way "home," we spent five nights in Custer State Park, South Dakota in mid October. It's a great park for wildlife in the Black Hills. Bison, Pronghorn, Mule Deer, White-Tailed Deer, Black-Tailed Prairie Dog, and wild Burro are common. We also saw a Bald Eagle and a Golden Eagle. The wild Burros are very tame and approach vehicles to be fed. One morning, we found a new-born foal that we named "Floppy" because it's ears were floppy (below left). Another morning, as we were headed back to the RV, we slowed to check out a Black-Tailed Prairie Dog town. I was surprised to see a Badger pop out of a burrow and we quickly photographed it from the car. After it went down into another burrow, I set up to photograph it from a tripod so I could get lower and also more aligned with the light. After waiting for about half an hour, the badger popped back up. It posed several times, excavated the first burrow where we had seen it, and then disappeared back down the second burrow.
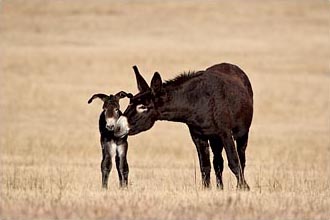
1/2000 sec, f6.7, ISO 320
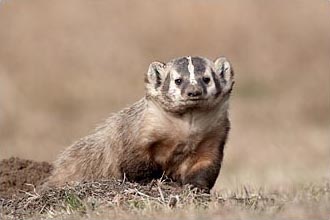
1/750 sec, f8, ISO 250
Take care and happy shooting.
— James
James Hager Photography :: www.jameshagerphoto.com

