

JHP Newsletter - 2009, No. 3, 5 May
We've had some great shooting opportunities since the last Newsletter, and I have some equipment items to tell you about.
Equipment: Canon EOS 5D Mk II
I used a Canon EOS 5D MK II while shooting at the Rio Grande Zoo recently because both of my EOS 1D-series bodies were being serviced by Canon. I had been considering the 5D MK II as a replacement for my 1Ds Mk II because it has a larger number of pixels (21.0MP vs. 16.7MP) and comparable capture rate (3.9 fps for 14 frames vs. 4.0 fps for 11 frames), so the opportunity to try one out in the field was welcome. While I usually use the 1Ds Mk II for landscape work, I do use it as a second body for wildlife work, so testing the 5D MK II at the zoo was relevant.
My first impression of handling the 5D MK II (w/o the vertical grip), was that is doesn't have the same build quality as the 1D series, but it doesn't feel cheap either. I really missed the vertical grip while shooting, but that could be rectified by adding a separate grip. The biggest weakness of the 5D MK II is the auto-focus (AF) system. There are fewer AF points than in the 1D series, and they cover a much smaller portion of the frame too. Sometimes it was a real challenge to select an appropriate sensor to get the focus I wanted because I like to frame first and then focus. Plus, I almost always use AI-Servo when shooting wildlife, so focusing and then recomposing really isn't an option. Another weakness (?) of the 5D MK II compared to the 1Ds Mk II is the blackout time in the viewfinder while taking an image: 145ms vs. 87ms. While it didn't effect shooting stationary subjects, it might make tracking birds in flight more difficult. The main "problem" when taking an image is that the shutter makes a much softer noise when it's activated compared to the crisp snap of the 1D series — it just doesn't sound right.
The image quality from the 5D MK II is spectacular! The large number of pixels, good AF performance, and great high-ISO performance, gave me lots of great images. It's definitely a step up from the 1Ds Mk II.
While I liked shooting with the 5D MK II for the most part, I think I'll wait for the price of a used 1Ds Mk III to come down. That will give me a second body with the same battery and control layout as my 1D Mk III, so switching between bodies will be easier and I'll only need one battery charger.
Equipment: Garmin eTrex Venture HC
After getting and using a Garmin eTrex Venture HC handheld GPS unit, I would encourage you to think about adding a GPS unit to your shooting gear. I hadn't gotten one before because I have a good sense of direction and am good at route finding, and I didn't want to have to carry another piece of gear into the field. I broke down and got the GPS specifically for our visit to the Bisti Wilderness (see below), an undeveloped badlands. The research I did before visiting indicated that there's a fence surrounding a water retention pond that must be taken into account because straight-line hikes from some of the interesting formations back to the trailhead will be interrupted by the fence, and it's much more efficient to head directly around the fence. Plus, because we'd be shooting at, and shortly after, sunset, we'd be getting back to the trailhead way after dark, and my route finding in the dark isn't nearly as good as when the sun's out.
The Garmin eTrex Venture HC handheld GPS unit is a basic color model that can store waypoints, routes (planned paths), and tracks (actual paths) and sync them with software on your computer for planning and future reference. The user interface for basic operation is adequate, but the interface for entering custom text for waypoints created while out in the field (like for the corners of the fence line or for interesting formations) is terrible. It was much easier to add some very simple text in the field and then edit it on the computer after syncing the data. It was great to be able to use the GPS to "map out" the Bisti Wilderness area on each hike so we could return to interesting subjects.
Equipment: SansDigital TowerStor TS2UT
Digital photography is almost as much about image processing and storage as it is about shooting. Hard drives aren't usually an exciting photographic accessory — you get one that's the size you want with the interface you want. My main image storage device for the last few years has been a G-RAID Pro from G-Technologies. It is a five-drive system with dual FireWire 800 ports and a hardware RAID 3 controller. (RAID 3 provides a good mix of performance and redundancy by splitting data and parity information across the RAID array.) I had five 500GB drives, and with the RAID 3 system, had 2TB of storage. The drive was reaching 80% capacity, the point where system performance will start to degrade, so I was in the market for a new storage solution. I looked at higher capacity RAID systems, but all reasonably-priced enclosures with hardware-based RAID require a PCI (or similar) eSATA card to drive the enclosure — not an option for my MacBook Pro. So, instead of trying to move up to a larger hard drive system, I decided to return to something similar to the good old days of floppies.
I bought two SansDigital TowerStor TS2UT enclosures to provide good speed and infinite storage space. This is accomplished through the two-bay trayless drive system and eSATA connectivity incorporated by each enclosure. It accepts bare SATA drives without a tray, so you can now have 1.5TB, or soon 2TB, drives that are interchangeable as easily as a floppy disk. I'm currently using 1TB drives because they provide the most storage for the money.
The TowerStor enclosure has hardware RAID 0 (striping, where the data is split between drives to increase speed), RAID 1 (mirroring, where the same data is written to each drive to provide redundancy), and JBOD (Just a Bunch Of Disks, where each drive is visible to the computer) selectable through a switch on the front of the enclosure. It has a USB 2.0 port and an eSATA port. I'm using it with the eSATA port to provide better data throughput, and I bought a Rosewill RC-605 eSATA ExpressCard that supports port multiplication, something that is required to run the TowerStor in JBOD mode.
For image storage, I use two 1TB drives in a RAID 0 configuration to provide 2TB of storage with good access speed, and I use Synchronize! Pro X to backup the data to an identical system in the second enclosure. (I actually make two backups, one that I keep on site and one that I keep off site.) This manual backup strategy makes more sense than a RAID 1 automatic backup because a RAID 1 system will immediately record changes (no possibility of recovering a file that you delete by mistake) and if there is a connection problem (either data or power) while data is being written, both drives could become corrupted.
I do use RAID 1 when it's appropriate. For example, I used it when I was copying data for the first time from other hard drives to a new set of 1TB drives for the TowerStor. I had been using bare IDE drives and a WiebeTech ComboDock to provide a similar "floppy" capability in the past, and I've moved all of the data from those drives to new SATA drives. Because it's data I don't use very often, and speed isn't that important, I will access the data in the future using the JBOD mode of the enclosure. While copying data to the main drive and a backup for the first time, I used the enclosure in RAID 1 mode so I could instantly get a backup. I wasn't concerned about a connection failure because all of the data could be recopied from the reference IDE drive if there was a problem. For normal operation, I will manually backup the main drive to the backup drive.
I'm currently using Western Digital Caviar Green WD10EADS 1TB drives for my primary storage because they have low power requirements, and Hitachi Deskstar 0A38016 1TB drives for backup because they're cheap. I use Centurian C2000 antistatic shipping boxes to store the bare drives when they're not in the enclosure. They are a little bigger than a bare drive, but they're much cheaper than the special drive cases sold by WiebeTech.
I highly recommend the SansDigital TowerStor TS2UT for your data storage. The enclosure is just slightly more expensive than a RAID 0 enclosure from Other World Computing where the drives are permanently enclosed in the case, and it provides great flexibility through the various RAID modes and trayless design for floppy-like operation. The combination of USB and eSATA ports provides almost-universal access (USB) and great data throughput (eSATA). The biggest drawback of the enclosure is the bright LED status indicators on the front of the panel. I've partially covered them up with gaffer tape to reduce the intensity from "spotlight" to "indicator."
Travel: Arches National Park and SE Utah
We were in Arches National Park, Utah, at the end of February, and had a great time! The first morning we went out to shoot, there was an uncharacteristic layer of fog! The formations sticking up out of the fog were spectacular and quite unusual, so we changed our plans to take advantage of the conditions. Balanced Rock is usually best shot at sunset, but with the fog, it was great at sunrise (below left). A little later, the fog had moved up into the Garden of Eden area, and the fog mingling among the layers was fantastic (below right).
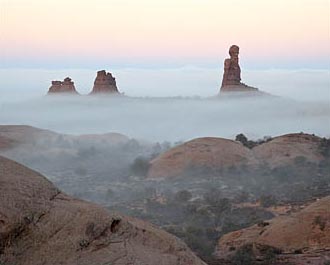
1/2 sec, f16, ISO 100
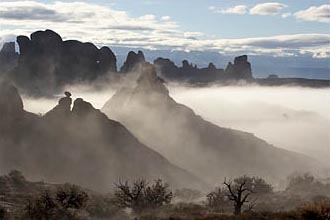
1/125 sec, f16, ISO 100
Right after Arches, we went down to Goosenecks State Park, in the southeast corner of Utah. It's a largely undeveloped park with the main destination being a small parking lot right next to the goosenecks of the San Juan River which form five back-to-back oxbow bends. We camped right along the canyon with a view out our dining room similar to the image below left. The image was captured using two exposures, one for the ground and one for the sky, and then combined in Photoshop. Nearby is Valley of the Gods, an area with many spires and buttes, and we had fun shooting there too (below right).
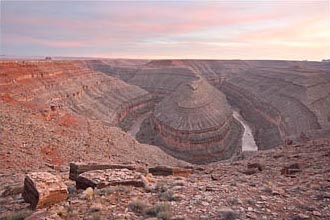
4 sec & 1.5 sec, f11, ISO 100
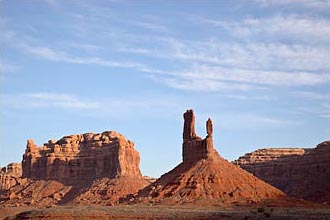
1/90 sec, f11, ISO 100
Travel: Bisti Wilderness
The highlight of our recent shooting was the Bisti Wilderness in northwestern New Mexico. It's an undeveloped badlands with many fantastic rock formations created by hard cap rock effecting the erosion of softer underlying rock. I broke down and bought a handheld GPS unit so we could find our way around the area, and it was especially useful as we hiked back to the RV after sunset in the dark through the badlands. On the way to a named formation one morning, I came across a group of boulders on low pedestals (below left). After shooting an area with a lot of hoodoos one evening, I got the most interesting shots after the sun had set with the diffuse light (below center). In many areas, there was a top layer of white sandstone that was very hard to walk on when it was dry, and it preserved the rivulets and channels where water had flowed during recent rains (below right).
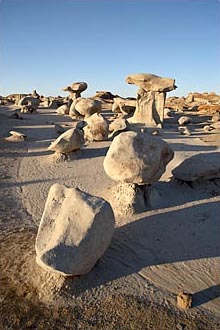
1/250 sec, f8, ISO 100

3 sec, f16, ISO 100
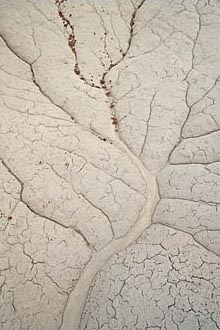
1/10 sec, f11, ISO 100
We had a spectacular sunset on our last evening there, and we were fortunate to have gone to the Stone Wings formations where we were able to get some great shots (below, left and right). Both of these images were created by processing the RAW file twice, once for the formations and once for the sky, and then combining them in Photoshop. Note that all of the images I've shared from Bisti were taken using my 24 TS (tilt-shift) lens. It's a great lens for wide-angle landscape photography because the tilt motion allows the plane of focus to be aligned with the subject so that the image throughout the frame can be sharper.
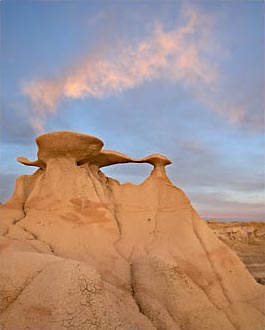
1/8 sec, f11, ISO 100
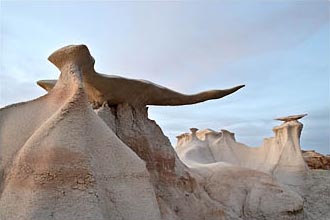
4 sec, f16, ISO 100
Travel: Rio Grande Zoo, Albuquerque
We stopped at the Rio Grande Zoo in Albuquerque on our way to Colorado. It's a medium-sized zoo, and they have great enclosures for gorilla (below left) and orangutan (below center) photography. They also have two walk-in aviaries that are good for photography, and the chattering lories (below right) were especially interesting.

New Mexico, USA
1/60 sec, f8, ISO 400

New Mexico, USA
1/250 sec, f8, ISO 500
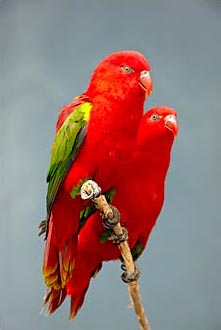
New Mexico, USA
1/60 sec, f8, ISO 640
Take care and happy shooting.
— James
James Hager Photography :: www.jameshagerphoto.com

