

Home > Blog > November 24, 2012 – Sunrise in Grand Staircase - Escalante National Monument, Utah, and using Lightroom for HDR
November 24, 2012
Sunrise in Grand Staircase - Escalante National Monument, Utah, and using Lightroom for HDR
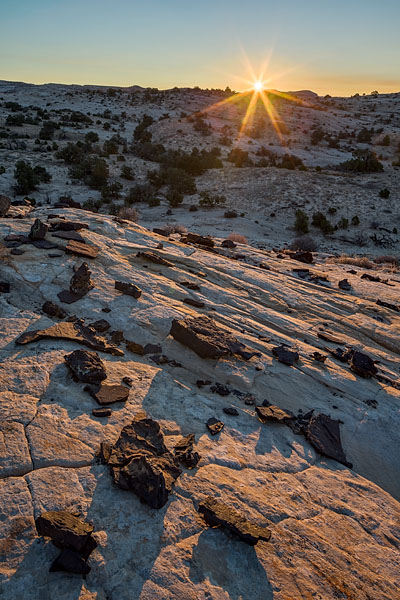
Sunrise
Grand Staircase - Escalante National Monument, Utah, USA
Canon EOS 1D X; 24 TS II; 1/3000, 1/1000, 1/350, 1/125, 1/45, 1/15, & 1/6 sec; f16, ISO 100
Image taken on November 7, 2012.
I processed the image that day by manually combining the exposures in Photoshop and I wasn't happy with the result. I reprocessed it yesterday using a new technique I learned from Jan to create an HDR image using a 32-bit file in Lightroom v4.1 or later. Here's how to do it.
- Set up Lightroom to do external editing in Photoshop using TIFF files: Preferences… > External Editing (tab)
- Import the bracketed photo series RAW files into Lightroom
- Select the bracketed photo series RAW files then select Photo > Edit In > Merge to HDR Pro in Photoshop…
- Wait for the images to load into Photoshop CS6
- Click the "Remove Ghosts" box, set the Mode to "32 Bit", then click "OK"
- Wait for Photoshop to create the 32-bit file
- Select File > Save and the file will automatically be put into the Lightroom catalog
- In Lightroom, select the 32-bit file then go to the Develop module
- Use the Exposure, Highlights, and Shadows sliders to develop the file w/o worrying about the typical HDR tone mapping controls
- Be amazed by the natural-looking results!
- Export the image to Photoshop by selecting Photo > Edit In > Edit in Photoshop CS6…
To show you how much better the Lightroom HDR method is on this image, the following shows the hand-blended image on the left and the Lightroom HDR image on the right. Ignore the difference in white point, and look at the sunburst. The hand-blended image is a bit muddy right around the sun and the top rays are less distinct compared to the Lightroom HDR image.
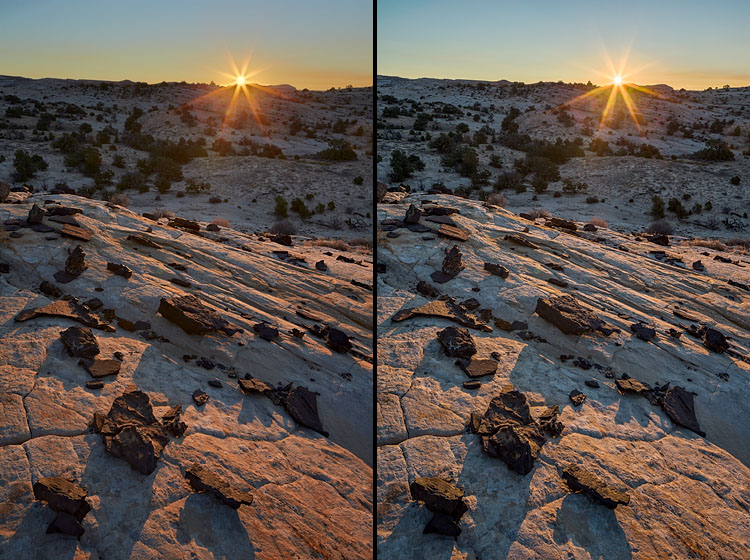
Left: blended by hand; Right: Lightroom HDR
- Set up Lightroom to do external editing in Photoshop using TIFF files: Preferences… > External Editing (tab)
- In Bridge, select the bracketed photo series RAW files, or already-processed TIFF files, then select Tools > Photoshop > Merge to HDR Pro…
- Wait for the images to load into Photoshop CS6
- Click the "Remove Ghosts" box, set the Mode to "32 Bit", then click "OK"
- Wait for Photoshop to create the 32-bit file
- Select File > Save As… and save a 32-bit TIFF file
- Import the 32-bit file into Lightroom
- Select the 32-bit file then go to the Develop module
- Use the Exposure, Highlights, and Shadows sliders to develop the file w/o worrying about the typical HDR tone mapping controls
- Be amazed by the natural-looking results!
- Export the image to Photoshop by selecting Photo > Edit In > Edit in Photoshop CS6…
Categories:
This particular blog entry is www.jameshagerphoto.com/blog/?date=2012-11-24. Visit www.jameshagerphoto.com/blog to view the latest blog entry, and you may click here to create a URL that you can bookmark to go to the latest blog entry.

