

Home > Blog > November 11, 2012 – Frozen Pool in Zion National Park, Utah, and the f-stop Satori EXP pack with Large ICU
November 11, 2012
Frozen Pool in Zion National Park, Utah, and the f-stop Satori EXP pack with Large ICU
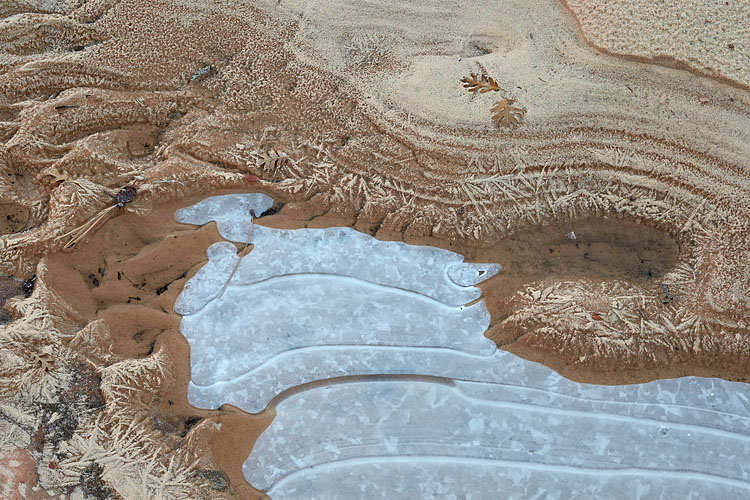
Frozen Pool
Zion National Park, Utah, USA
Canon EOS 1D X, 90 TS, polarizer, 1/4 sec, f11, ISO 100
Image taken on November 11, 2011.
This morning I went to my favorite pools and they were frozen. After photographing the grand scene in the pre-sunrise light and at first light, I turned my attention to the interesting ice in the very shallow pools upstream of the main pools. Not only was I drawn to the ice bubbles, but the sand along the edges had formed crystalline patterns when it froze.
f-stop Satori EXP With Large ICU
I also used my new f-stop Satori EXP pack for the first time in the field this morning. I had been reading great things about the f-stop bags so I bought a Tilopa pack and a Large ICU (Internal Camera Unit) about a year ago. The ICU was about 1.5 in (4 cm) narrower on the inside than the LowePro Pro Trekker AW pack I had been using for years, and I couldn't figure out how to get my gear in the ICU. Plus, there wasn't much space left at the top of the pack to carry clothes and water, so I returned everything. My interest in f-stop bags returned when I had to be very careful with my LowePro pack while photographing in Goblin Valley State Park to keep the sand off the part of the pack that goes against my back. Then I saw an f-stop pack up close and personal in Arches National Park, and I decided to give f-stop another try. I ordered a Satori EXP pack which is a bit taller than the Tipola that I had before. The Tipola was the largest pack that I could fit in our towed vehicle at the time, and I made sure that a Satori EXP would fit in my new towed vehicle. :) Another factor was that the revised f-stop website indicated that the ICUs are now about 1 in (2.5cm) wider than they were a year ago. Well, when I opened up the new Large ICU, it was the same width as last year. :( Fortunately, the ingenious loading system I had developed through a CAD drawing still worked — almost. The space between the metal stays in the pack is about 1 in (2.5cm) narrower than the inside of the ICU at the top of the rear access panel, so I couldn't fit my gear into the ICU with it in the pack. By turning the layout upside down, I was able to get my gear into the ICU with it in the pack. The image below shows how I fit the following gear:- TS-E 90mm f2.8 with stacked EF12 and EF25 extension tubes below it in the top row left
- TS-E 24mm f3.5 L II in the top row center
- EF 24-105 f4 L IS USM in the top row right (now shown as it was attached to my 1D Mk IV to take the images)
- Hoodman HoodLoupe 3.0 in the middle row left
- TS-E 17mm f4 L in the middle row center
- 1D X in the bottom row left
- EF 70-200mm f2.8L IS II USM in the bottom row right
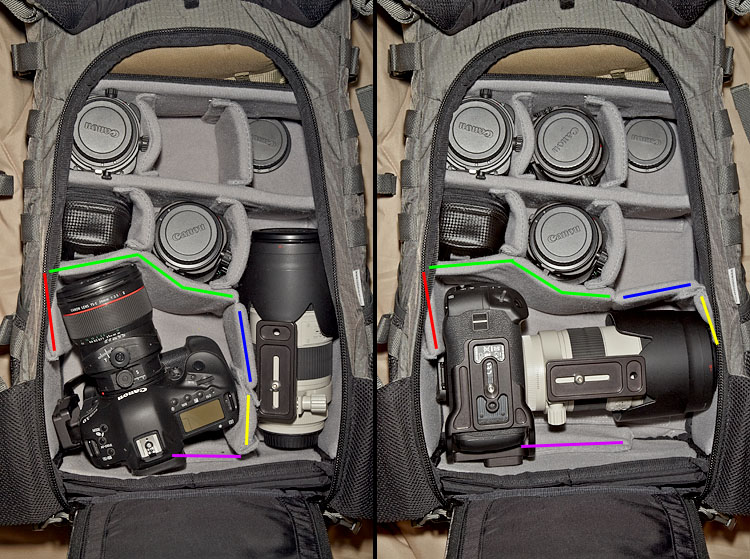
Note that there's room when the 70-200 is attached for a short lens on the right side of the middle row, and I may start to use it to hold one of the lenses that's currently in the top row so I can put some of my miscellaneous small gear in the top row. The spare battery, angle finder, timer release, and remote release are currently just floating around in the small pocket of the Satori EXP, and I don't like the sound of them bouncing against each other when I wear the pack.
There's enough room above the Large ICU to carry my set of filters, a fleece, a second thermal layer, and a 32 oz (950 ml) Nalgene bottle. My rain jacket can fit in the back pocket when the top's fully loaded. I also have a Medium ICU on backorder so that I can set it up to carry fewer lenses and have even more room for clothes and water in the top of the pack.
The Satori EXP is very comfortable! The pack and Large ICU not only weigh a lot less empty than the LowePro Pro Trekker AW, but the camera gear is only about 1/2 in (1.3cm) away from my back whereas it was about 1.5 in (4cm) away with the LowePro. This puts the weight closer to my natural center of gravity so I can stand up straighter while wearing the pack.
If you've been thinking about getting a new backpack to carry your camera gear, I can highly recommend the f-stop packs.
Categories:
This particular blog entry is www.jameshagerphoto.com/blog/?date=2012-11-11. Visit www.jameshagerphoto.com/blog to view the latest blog entry, and you may click here to create a URL that you can bookmark to go to the latest blog entry.

